Quilt Archive

Sunday, December 29, 2013

New Zoo Memory Book

Greetings Blogger Friends,

I have another scrapping project to share with you.  This is another accordion book that I made for Denis' brother and his wife.  They live in Iron Mountain, MI and came down to Suamico (NW of Green Bay) for a one day bus trip last summer to the New Zoo (follow this link to see their website).  Denis and I met them there and spent a few hours visiting with them and the animals.  My favorite thing was the Albino Alligator and Bev's was feeding the giraffes.

This book is an accordion book, which means the front and back cover and inner pages are all attached.  It is the 9" x 9" size and is sold by Close to My Heart (now retired, but you can still find them occasionally on eBay).  There are a total of 8 pages to the book, including the front and back cover.

Here are some of the pages from the book:


 Front cover.
 
 When I make a small theme book like this, I like to use the same paper packet throughout.  This paper packet is called Miracle (retired) from Close to My Heart.
 
 
I also used the coordinating sticker sheets to the Miracle Paper Packet.  Add a few sparkle brads, and the page is done!
 
Here's Bev feeding the giraffes.

My favorite, the Albino Alligator.  His name is Lucky, but I think it should be "Whitey".

My favorite page of the entire album is also the back cover. 

Overall, I'm very happy with how this book turned out.  Gordon and Bev liked it too.  It is a nice memento of a pleasant afternoon.

More show and tell next time...See you then and thanks for looking!!

Saturday, December 28, 2013

Pinewood Derby Memory Book

Welcome Back Blog Friends!

In addition to some sewing projects for Christmas 2013, I also made several scrapbooking gifts.

This book is an accordion book, which means the front and back cover and inner pages are all attached.  It is the 9" x 9" size and is sold by Close to My Heart (now retired, but you can still find them occasionally on eBay).

I made this book for my oldest Grandson, Conner, who is in Cub Scouts and participates each year in the Pinewood Derby.  Conner won first place in his age group in 2012 (I made him a book last year for Christmas too), and repeated that achievement this year.  Since I made him a book to commemorate the day last year, it was a "given" that I would make one this year too.  Here are some of select pages from the book:


Conner has the glasses, the other young man is his brother Corey (who took 3rd in his age group).
Conner's car is the 3 musketeers bar in the middle.

 I got some great action shots of the cars crossing the finish line.  Conner's car ran in 6 races and won each one!
 

Here is Conner with his book on Family Christmas Day.
 
 
I made another one of these accordion books as a Christmas gift for Denis' brother and his wife.  More on that one next time.  Thanks for stopping by!

Friday, December 27, 2013

Cutest Little Purses Ever!!

Hello again Blog Friends!

Here is another Christmas gift that I made this year.  Earlier this fall, Mom and I attended a quilt show in Marshfield, WI.  There, I saw the cutest little purse ever...bought the pattern and hardware...and some fabric.  I made these for my two little granddaughters.  They loved them!
 The fabrics for both purses have gold accents.  I also added a yo-yo with a gold button center to each purse. 

Here's Granddaughters Hailey and Bridget with their purses.  Of course, Grandma also put some fun stuff inside...like crayons, notebook, pens.


The pattern is Marissa's Bag by Sewphisiti-Cat Designs. (follow this link for this purse and more).  Dims: 11" wide, 7" high, 3.5" deep.  You make the entire purse, then gather it onto removable rods which attach to the purse handle.  You can actually make one of these purses for each month, holiday, or season.  With an easy changeover, you'd be ready for any occasion. 

More Christmas crafts next post!

Wednesday, December 25, 2013

Antique Golf Club Display

Hello Bloggers!

This year Denis hand made an antique golf club display for my brother, Dave.  Denis had some old golf clubs and Dave is an avid golfer...a perfect combination.

Denis acquired the set of golf clubs in 1969, when he was 16 years old.  A friend of his did some odd jobs for a wealthy family in town.  One of those odd jobs was to clean out a garage packed full of stuff.  One of the things was an old golf bags with clubs in it.  Anything the family didn't want was up for grabs, so Denis' friend took them.  Denis bought them from him for $5.  These golf clubs were made in Scotland by the Andrews Golf Co (under the George Nicoll brand name) and came out about the time the transition from hickory to steel shafts was happening (we figure circa 1940's).  These are steel shafted clubs, but painted to look like wood.  Denis chose the three most interesting clubs for the display...the Mashie, the Spade Mashie, and the Mashie Niblic.  Denis crafted the display out of hardwood, stained and poly coated the pieces, and added a nice green felt backing.  Here's the finished product:

We gave it to Dave today.  He loved it.

Good Job, Denis!   More on my holiday handiwork next post.

Merry Christmas!

Hello Blog Friends and Merry Christmas to you all!

The festivities here at our house have ceased, and all but a few gifts have been given.  We have yet to travel this coming weekend to Iron Mountain, MI for Christmas with Denis' brother and his family.

We live in split level home.  We have a living room upstairs, just off the dining room and kitchen, and a living room in our lower level also.  We have a large 6 ft. tree upstairs, and a 4 ft. tree downstairs.  Here is a picture of our upstairs tree:


And our downstairs tree:


Although you can't see the detail very well, our smaller tree is decorated with ornaments hand made by Denis' late mother, Stella.  She loved to do plastic canvas needlepoint in her later years.  We added some round balls in various colors to fill it in.  It is a very special tree, especially for Denis, as it keeps the spirit of his mother alive for him each year.

My dad loved jigsaw puzzles.  One of our holiday traditions when I was growing up was to have a jigsaw puzzle working over the holidays.  He always set up the card table and we'd all work on it over the course of the holiday season.  A number of years ago, I resurrected this tradition, and now we work a puzzle at Christmastime in memory and in honor of my Dad.  And, it is still done on his original card table.  It just wouldn't be right any other way.  Here is a picture of this year's puzzle: 

It was begun and completed on our family Christmas day held this past Saturday.

Although both Denis and I were busy with holiday shopping, baking and wrapping, we still found time to work on some holiday gifts.  More on those next post.


Again, Merry Christmas to you and your family!!


Sunday, December 8, 2013

Candle Cradles

Hello Blog Friends,

Well, I've been busy this week, writing and editing my holiday newsletter, and getting the house decorated for the holidays.  Decorations are now all done, so it's time to sit back and relax, right?  Wrong!  I still have several sewing projects (small, thank goodness) to finish.

I thought I'd share a cute little candle mat idea with you.  My mom and I came across the pattern for this on our travels in Kewaunee County last year when we stopped in at Fabric Creations in Manitowoc.   Mom has made these as gifts for friends of hers and she's made me a couple too.  Each mat is easy to make, and uses prairie points to gently "cradle" the candle that sits in the center.

I've made these and several others as gifts this year.

Aren't they just too cute!

'Til next time...

Sunday, December 1, 2013

Cardinal Hex Table Topper

Hello Blog Friends,

I hope you all had a happy Thanksgiving with family and friends.  We held our family Thanksgiving celebration on the Saturday before (the 23rd).  Here is a photo of the grandkids "playing pool". 


On Thanksgiving Day, we traveled to Stevens Point and spent the day with my Mom.  We did things the easy way, and went out to a local supper club for dinner with all the trimmings.  My brother and his wife also joined us.  It was a lovely day.

Although it's been a hectic week, I haven't exactly been sitting idle.  Here is a picture of a Cardinal Hex Table Topper that I made last week and gave to my Mom.  These hex toppers are so easy to make!  4 or 5 fat quarters, 1/2 yard of backing, some batting, and that's it!

I've also been making some "Candle Cradles" to give as gifts to friends.  I'm just in the finishing stages of those, and I'll share those next time.

Until then...

Tuesday, November 19, 2013

Aspen Autumn, Finished!

Greetings Blog Friends,

Aspen Autumn is finished!

 
As you can see, Aspen Autumn is very linear, very vertical.  I think I was right when I felt that an all-over curved meander quilting pattern was best for this project.  I know that I like the finished piece.  It is by no means perfect, and I need to practice more with free motion to try to get more uniform stitches.  But, I think it is not bad for a first attempt.  For me, it's definitely a keeper.
 
Next time...a new project in the works.  Snack Attack!


Sunday, November 10, 2013

Aspen Autumn, Finishing Stages

Blog Friends,

I am happy to report that Aspen Autumn is in the final, finishing stage.  I completed the quilting on it today, and hope to finish the binding tomorrow night.

I quilted Aspen Autumn with a large meander (stipple) pattern.  It was my first attempt at free motion quilting.  Up until this quilt, almost all of the quilting I did by machine was straight line stitching.  Because Aspen Autumn is so linear (you'll see what I mean when I post the final picture), I wanted something different and decided on the large meander in a random pattern. 


As I said, I had not done any free motion quilting up until this time.  To prepare, I watched several very good videos on line and picked up some quilting tips.  I also did some practice stitching each night.  I had some (not so favorite) fabric along with some leftover batting from previous projects.  I made myself some quilt sandwiches, and filled each one with random curves and shapes.  

After a week's worth of practice, I felt it was "now or never", and decided to just do it.  The quilting is not perfect, I have some uneven stitches here and there, and some jerky stop/start points.  I tried to do most of my stops and starts in the darker gray fabric.  If I was grading this, I'd give myself a solid C... for satisfactory but not outstanding.  But, I'm happy with it (because it is done!) and am going to display it each fall. 

Next post will be the finished quilt!


Sunday, November 3, 2013

Marshfield Quilt Show 10/26/13

Hello Bloggers!

Last weekend, Denis, Mom and I attended the Treasures of Tomorrow Quilt Show in Marshfield, WI.  It was a smaller show, but very nice.  We got to see the work of quilters outside our usual area, and to see and meet vendors from other cities as well. 

Here are some of the quilts that were our favorites:

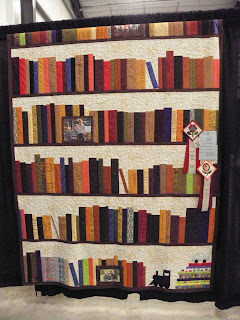
Alex's Bookshelf.  This one won two ribbons.

This one is called Pumpkin Hollow Town Square.  It has a pieced center section as well as a pieced outer border.  The blocks surrounding the center are all embroidered.  Each block is quilted to enhance the embroidery.  Here's a close up of one of the blocks.


This one was an applique wall hanging called African Safari.


Here is an album quilt with a Christmas theme.
 

Here is one with a Dresden plate variation.  This is one of my favorite blocks.  I have yet to make a Dresden Plate quilt.
 
 
As you can see, there was a wide variety of quilt themes and styles.  We had a great time at the show.

Aspen Autumn, Blocks on Point

Welcome Back, Blog Friends!

Again, it has been several weeks since my last post. 

I've set the blocks on point in long vertical rows.  Here's a peek at this step.


I needed to order more fabric from Connecting Threads for backing.  I haven't been sitting idle during this period, tho.  I've been to a quilt show, made a scrapping Christmas gift, and have been working on Aspen Autumn.The top is finished, and it is layered and pinned, ready for quilting and binding. 

Stay tuned...I'll show you the finished quilt soon!

I've also been working on my next project...more on that next post.

I

Tuesday, October 15, 2013

Aspen Autumn Adding Some Color

Hello Blogger Friends,

Time to add some color to those HSTs!  These blocks are the next step in the process:


Next time, setting the blocks on point.

Sunday, October 13, 2013

Aspen Autumn HSTs done!

Hello Blogger Friends,

I have some progress to report...my HSTs are done!  This pattern had an unusual way of making them (at least I've never done HSTs this way before):

First, I cut a 17" square of two fabrics.  I placed them right sides together, then drew a grid of squares on the lighter piece.  Diagonals were then also drawn in the squares.  Then, I stitched 1/4" from each side of the diagonals, then cut the  squares and diagonals on all drawn lines.  From the 17" squares of fabrics, I wound up with 32 3 1/2" sewn squares and a little bit of scrap.  I've never made HST blocks this way before, so this was a new one on me.


The stitching lines were a scant 1/4", so some of the squares needed to be trimmed just a slight bit to the 3 1/2" finished size.  Also, because I used a continuous line from edge to edge, each set of sewn triangles had a few stitches on the opposite corner (from the center stitched seam).  I quickly removed these corner stitches so I could open the piece up to press.

Next time, adding some color!

I'm back!

Hello Blog Friends!

Sorry I've been away for a few weeks.  I was on a scrapbooking retreat, then was working some long, long hours at work!  All of our contractors have been working doubly hard to finish projects before winter.  It seems that in the concrete business, the construction season is not over until the snow flies. 

I'm back to normal hours now, and back to my crafts.  I spent the better part of today working on Aspen Autumn.  See the following posts for progress reports!

--Susan

Sunday, September 22, 2013

Aspen Autumn Preview

Hello Blog Friends,

Just a few words and pictures to introduce you to the next sewing project...a throw quilt I have named "Aspen Autumn".  These fabrics are from the Sun-Kissed Harvest collection by Connecting Threads.  These are a group of various texture patterns in fall colors of yellow, gold, orange and grey. 
 
 This is the main print the collection is based on.  It reminds me of the tall Aspen trees in the Rocky Mountains, and how beautiful they are in the autumn.


First up, half square triangles! 

Friday, September 20, 2013

Kitchen Hex Show and Tell

Hi Blog Friends,

No, I'm not putting a "hex" on my kitchen ( as the title might suggest!).  I'm here with a quick "Show-and-Tell" of a kit I picked up at the Quilt Expo a couple weeks ago.  I purchased it from the Saving Thyme booth.


This was an easy table topper to make.  I started with a pre-cut hexagon of the center fabric.  Then, I added three rows of precut strips, then a binding, and done!  This was a quick project (2 hours total, including sewing binding down by hand) and this kitchen hex graces my hutch in the kitchen.


Purchasing this kit was a "no-brainer" for me.  I have a collection of red vintage kitchen items on display already.  This is a perfect complement to all my other treasures.  Kitchen Hex measures 18" x 21" finished.

Next time...preview of a new sewing project.

Wednesday, September 18, 2013

Chicago Museum Pages

Hello Blog Friends,

Denis and I were in Chicago several years ago and we visited the Museum of Science and Industry.  I've been diligently working on finishing up the pages for this museum, then our Chicago album will be done.  Here are some of the pages I have done recently:

For the Circus exhibit:
 These pages were mad with the "Animal Cookies" paper pack by Close to My Heart.  I love the whimsical colors and patterns.
 I also relied heavily on my Cricut die cutting machine to cut the silhouette shapes and the letters in the top photo.  This page has pictures of the circus train diorama at the museum. 
Here is a working model of a three ring circus under the big top.  I again used cutouts made with the Cricut.  All the cutouts were from the "Carousel" cartridge.

For the Ships exhibit:


These pages are made with the "Majestic Blue" paper packet from Close to My Heart.  The antique map print paper was perfect for pictures of old time sailing ships.

Next time... A Show and Tell project from the Quilt Expo.


Tuesday, September 17, 2013

Quilt Expo Part 2

Hello Blog Followers!!

As promised, here are some of the more traditional quilts that we admired at this year's Quilt Expo:
An unusual round piece called Pow Wow Ponies by Viola Colombe

This one is a combo of two of my favorites...red and mariner's compass.  Maritime in Red is by Clem Buzick and Ann Helbling

This one uses the "stack n whack" technique" by Jean Hensen is called "Autumn Splendor"


Flying Home by Marian Seffrood
Salvaging Selvages 12: Interconnected by Alice Weickelt

Another one of my favorite patterns...the Dresden Plate.  This one is called
Nana's Dishes and is by Jean Bauer
 
Denis and I both had our favorite at the show:


This is Denis' favorite.  It reminded him of those M.C. Escher optical illusion drawings.  This one is named "Labyrinth Walk" and is made by Maren Anderson.
 
This one was my favorite.  "Memories of Mom" was made by Pennee Clanton.
 

That's it for the Quilt Expo for 2013. 
 
Until next time...